Showing posts with label Holiday Family Fun. Show all posts

February 11, 2013

Kool Aid Play Dough

Kool aid play dough is a perfect activity for children of all ages. Homemade kool aid play dough will provide hours of fun not only for the kids but for adults too! This year for my little one's preschool class I am wrapping a small amount of play dough and tagging it with the message
"Everyone Kneads a Little Love"
and of course everyone will get the recipe too! If you have never made homemade play dough I highly encourage you to do so! It is such a fun, family activity everyone will enjoy!

Kool Aid Playdough

Now on to the recipe...
1 cup of flour
1/4 cup salt
2 tsp cream of tartar
1 package of any flavor/color kool-aid (.14oz)
(I used strawberry in this batch)
1 TBS + 1 1/2 tsp oil
1 cup of water

In a large bowl mix dry ingredients. In a small sauce pan heat oil and water just until simmering. Add water and oil to the dry ingredients. Mix well with a large spoon until a dough mixture is developed.  Once the dough has cooled knead into smooth play dough. Store in airtight container and refrigerate when not in use.

Adding kool aid not only gives the dough color but gives the dough fun scents such as lemon, cherry, strawberry, lime, and orange.

No worries, if your child consumes the play dough it is non-toxic and it shouldn't stain hands! Yay :)


December 19, 2012

Merry Christmas Pancakes

Every Christmas I make a traditional breakfast of Chocolate Chip Pancakes and Homemade Whipped Topping, but this year I am adding cocoa!
I would love to share this recipe with you so let's get started!


Chocolate Chip Pancakes with Chocolate Whipped Toppping

Chocolate Chip Pancakes
makes approximately 10 pancakes
2 cups all purpose flour
1/2 tsp salt
2 TBS sugar
4 tsp baking powder
1 1/2 cup milk or buttermilk ( add a little more if needed)
2 eggs (slightly beaten)
1 tsp vanilla
4 TBS vegetable oil
3/4 cup chocolate chips

Combine dry ingredients together. Then mix in milk, oil, eggs, and vanilla. Mix until all lumps are gone and then gently stir in chocolate chips.

Heat
a lightly greased griddle to medium heat, adjust heat as needed. I use an electric griddle and set the temperature to 350 degrees.  Pour or scoop approximately 1/3 cup of batter onto the griddle, use more or less batter to create your desired size of pancakes. Brown pancake on both sides and serve warm!

Top pancakes with...

Chocolate Whipped Topping
2 cups of heavy whipping cream
5 TBS powder sugar (add more or less to your liking)
3 TBS cocoa powder
1 tsp of vanilla extract

Chill your mixing bowl and beaters in the freezer for about 10 minutes. Then in a large metal bowl, whip cream until stiff peaks are just about to form.
Then beat in vanilla, sugar, and cocoa powder until peaks form.

Decorate your pancakes with festive sprinkles, chocolate chips, and a dusting of powder sugar! I hope you and your family will enjoy these very yummy Christmas pancakes this year!

December 17, 2012

Latkes to Eat

This past weekend my family and I celebrated the last night of Chanukah with yummy latkes and applesauce. The most wonderful thing about Chanukah is remembering the miracles of long ago. If you have not had a chance to read the Chanukah story I challenge you to read a piece of history that will never be forgotten.
This year I experimented with a yearly traditional potato latke recipe and it turned out wonderful. I would love to share this recipe with you so lets get started!

Latkes

Ingredients:
4 medium sized potatoes
1 zucchini
1 small red onion
1 egg, slightly beaten
1/2 tsp salt (or to taste)
pepper to taste
5 heaping TBS flour
*oil for frying

Wash, peel and grate potatoes, zucchini, and onion. Strain potatoes, but not too dry. Add grated onion, zucchini, salt, pepper, and the egg, mix well. Add flour and beat into potatoes, mixing well. Heat enough oil to cover bottom of frying pan, about 1/4 inch of oil. Heat oil until it reaches 350 degrees. Carefully drop by heaping tablespoonful's into hot oil. Adjust heat as needed. Press on the latkes as they are frying to create a pancake like appearance. Brown on both sides. Drain on absorbent paper. Serve immediately or keep latkes in a warm oven until ready to serve.

Delicious served with
applesauce or sour cream. For a wonderful Easy Slow Cooker Applesauce recipe click here.

Cilantro Lime Sour Cream
8 oz light sour cream
juice of 1 lime
zest 1 lime
1 TBS chopped cilantro (add more if you like)

Mix all ingredients and dollop over latkes.

Enjoy! :)

July 21, 2012

Root Beer Pancakes

Looking for a fun weekend breakfast for the family? Well, look no further...these pancakes are perfect! Fluffy, moist and sure to please everyone. Top with a scoop of homemade whipped cream and lightly dust with powder sugar.

Root Beer Pancakes

Root Beer Pancakes
serves 8

1 1/2 cups Root Beer ( I used A & W)
2 cups all purpose flour
1/4 cup sugar
2 tsp baking powder
1 tsp baking soda
2 eggs
1/4 cup butter melted
1 tsp vanilla extract
cooking spray

Combine dry ingredients into a bowl. Add Root Beer, eggs, butter, and vanilla to the dry mixture and mix. Mix until all lumps are gone.

Heat a lightly greased griddle to medium heat, adjust heat as needed. I use an electric griddle and set the temperature to 350 degrees.  Pour or scoop approximately 1/3 cup of batter onto the griddle, use more or less batter to create your desired size of pancakes. Brown pancake on both sides and serve warm!

Homemade Whipped Cream
1 cup heavy whipping cream
1/2 tsp vanilla extract
1/4 cup powder sugar, sifted

Chill your mixing bowl and beaters in the freezer for about 10 minutes. Then in a large metal bowl, whip cream until stiff peaks are just about to form. Beat in vanilla and sugar until peaks form. Scoop (using an ice cream scoop) whipped cream and top pancakes. Lightly dust with powder sugar and serve with a smile!

Enjoy!

April 22, 2012

Happy Earth Day

To celebrate Earth Day the kids and I made Earth Rice Krispies Treats! This is a fun visual for little ones and gives you an open opportunity to inform them about how important their planet is to their future! This fun family project can allow you to talk about ways everyone can save energy around the house!

Earth Rice Krispies Treat

These are a few ways we try to reduce energy around our house!

-turn off the water while brushing our teeth

-turn off lights in a room when it is not in use

-place recycling where everyone can use it

Ok, now onto the recipe and tutorial...

3 tablespoons butter or margarine
1 package (10 oz., about 40) regular marshmallows
or
4 cups miniature marshmallows
6 cups Kellogg's® Rice Krispies® cereal
blue food coloring
green food coloring

Note
-For best results, use fresh marshmallows.
-1 jar (7 oz.) marshmallow crème can be substituted for marshmallows.
-Diet, reduced calorie or tub margarine is not recommended.
-Store no more than two days at room temperature in airtight container.

Divide all ingredients in half. You will need two pans, one pan for blue and the second pan for green.
In two large saucepans melt butter over low heat.
 

melt butter

Divide marshmallows in half, add 14 drops of blue food coloring to one pan and 14 drops of green food coloring to the other pan. Stir until completely melted.
Remove from heat.
 

Coloring Marshmallows for Rice Krispies Treats


Add  3 cups of KELLOGG'S RICE KRISPIES cereal to each pan.
Stir quickly until well coated.
Then, with cooking spray coat 2 large mixing bowls and add the green mixture to one bowl and add the blue mixture to the other bowl.
 

Green Rice Krispies

Blue Rice Krispies

Once the mixture is cool (5-10 min), spray hands with cooking spray, then use your hands to combine the colors and form into a ball. Make into any size you like! Yes, your hands will be sticky, but not too bad :)
Best if served the same day.

Earth Day Rice Krispies Treats

This is my little one enjoying this beautiful day outside and eating "My Planet", so he says!

Earth Day Treat

April 6, 2012

Cocoa Krispie Bird's Nest

 Hello  everyone, hope you are having a wonderful day!
These little krispie treat bird's nests are nothing new, but so much fun if you have never made them! Not only are they fun but they are super easy to make :)

I highly encourage you to let your children in on this project because it will bring a smile to their little faces and joy to your heart!

Cocoa Krispie Treat Nests
Ingredients

3 tablespoons butter or margarine
1 package (10 oz., about 40) regular marshmallows
- OR -
4 cups miniature marshmallows
6 cups Cocoa Krispy cereal

Directions
1. In large stockpot melt butter over low heat. Add marshmallows and stir until completely melted. Remove from heat.
2. Add cereal. Stir until well coated.
3. Using buttered spatula or wax paper evenly press mixture into a muffin pan coated with cooking spray. Cool, remove from pan, and shape into a nest. Add Whoppers Mini Robin Eggs, jellybeans, or even a Peep birdie inside the nest to give it that authentic feel.
Best if served the same day.

Tips:
-Use fresh marshmallows.

-1 jar (7 oz.) marshmallow crème can be substituted for marshmallows.
-Diet, reduced calorie or tub margarine is not recommended.
-Store no more than two days at room temperature in airtight container.
- Did you know you can freeze these fun treats? Place in layers separated by wax paper in airtight container. You can freeze them for up to 6 weeks. To thaw set out each individual treat for about 15 minutes before serving.

Hope you have fun making this recipe in your kitchen this Spring!

February 13, 2012

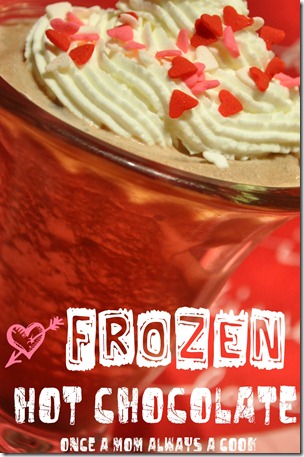
Frozen Hot Chocolate

Pin It
Original Source

Serendipity is a NYC ice cream parlor that's famous for its over-the-top Frozen Hot Chocolate. When I get a chance to visit New York this is one place I want to be with my love!

Guess what?!
I found a recipe that will take you to NYC with your love right in the comfort of your home! This recipe is from Joy Bauer, click here for the original source. If you are looking for yummy healthy recipes she has a huge variety to choose from. Everything I have tried is always full of flavor, low calorie, and a big hit with my family!

Another surprise…without the whip cream it has only
150 calories per serving!
Perfect if you are watching your waist line this Valentine’s Day!

Frozen Hot Chocolate

Makes 4 Servings

INGREDIENTS
1/2 cup chocolate syrup
1 cup milk, evaporated, fat-free
1/2 teaspoon vanilla extract
3 cups ice cubes

PREPARATION

1. Combine chocolate syrup, evaporated milk, vanilla, and ice in a blender and blend until smooth

2. Pour into glasses, and garnish with a dollop of whipped topping or a sprinkling of chocolate shavings if desired.

Variations:
Mexican Hot Chocolate: Add ¼ teaspoon ground cinnamon.

Peppermint Hot Chocolate: Substitute ¼ teaspoon mint extract or 1/8 teaspoon peppermint extract for the vanilla extract.

Happy Valentine’s Day

February 10, 2012

Valentine Sugar Cookies

Pin It

This was my first time making roll out sugar cookies!
I am such a drop by the spoonful kinda girl!
When I was looking for a recipe I went to the one and only
Sweetopia! 
If you have never stopped by to visit this blog, hop over there right now! Marian’s blog/website is packed full of how to tutorials.
I did not attempt royal icing, but it is on my to-do-list.

For icing I used my whipped topping recipe, find the recipe below!

Valentine Sugar Cookies
Click here for the Sugar Cookie Recipe.
I halved the cookie recipe and it made
approximately 20 heart shaped cookies
for the size of cookie cutter I was using.

How to make…

Pink Whipped Topping

I use whipped cream often in the place of icing. YUM YUM!

Ingredients

2 cups heavy whipping cream
1 tsp vanilla extract
½ cup of powder sugar sifted
Wilton’s pink icing color
(add a little at a time to reach desired shade)

Chill your mixing bowl and beaters in the freezer for about 10 minutes. Then in a large metal bowl, whip cream until stiff peaks are just about to form. Beat in vanilla and sugar until peaks form. Enjoy on top of cupcakes, cookies, or heart shaped pancakes. The possibilities are endless!

After topping your heart cookies with whipped topping add pretty and festive sprinkles and enjoy!

Happy Valentine’s Day!

January 26, 2012

Melted Crayon Hearts

Pin It


This project is so much fun for the kids. I highly encourage you to allow your kiddos to experience the process of making these fun Valentine Crayons.
I have been wanting to do this project with my family for quite some time now.
I have finally allowed enough time to complete this exciting Valentine!
We had a huge bucket of used crayons waiting to be transformed into
creative, family fun!

Fist step:
Peeling off the crayon paper is time consuming! In this process your kids will be a big help. Even my four year old helped! I set a big bucket of used crayons in the middle of the table and an empty tub for the peeled crayons. I left it there for a few days, so when we had down time we would peel off the paper. 
It was also a great conversation starter for all of the family.

* I did not use any brown or black crayons.
If you want a more softer look use less blues and purples.

cut crayolas


Second Step:
Place cut Crayons in a heart shaped silicon pan and bake @ 250 degrees for 10-15 min.
crayolas in a heart shaped pan


Allow the melted crayons to completely cool before removing from pan. The top of the heart will look different than the bottom. Be patient for the heart crayon to dry because 
this mosaic look is at the bottom :)
After cooling you will have an awesome Heart Crayon Valentine! 
You Color My World


These cute Valentine's are going to my little man’s preschool class!
You color my world valentine


x

December 27, 2011

Happy Chanukah

I hope everyone had a wonderful Christmas filled with many sweet memories that will last a lifetime.
My family and I had an unforgettable Christmas this year and I could not have asked for more. Christmas is a very important remembrance of the wonderful birth of Jesus and I love to read the story of Christmas to my children and see there faces light up. This year my four year old was very interested in the manger scene and I was so touched that he wanted to know all about the birth of sweet, baby Jesus.
 
My family and I also observe all the Jewish holidays and this time of year we remember another miracle through the Chanukah story. If you have never read this story I encourage you to take a moment and read another miracle of Emmanuel.
 
 
Our Chanukah is filled with family fun

dancing

 and of course food!
             Pin It

I always make latkes and applesauce and would love to share the recipes I use.
Click on each link for the full recipe.

Easy Slow Cooker Applesauce

Stove Top Homemade Applesauce

Latke Recipe
 

December 6, 2011

Snowman Pretzel Sticks

Christmas time is underway and the cooking has begun!
These snowmen pretzel are so much fun for the kids to make. The smaller ones will love to sprinkle red and green sugar crystals and the older ones will fun have dipping pretzels in the chocolate and decorating! This is a winter treat sure to please anyone from 1 to 99 :)
        Pin It

First I prepared all the candy on a sheet of wax paper for easy access.

Accessories for Pretzel Snowmen
Hats- gum drops and black jellybeans with a Twizzler rim
Eyes- mini chocolate chips
Nose- orange decorating icing
Mouth- black decorating icing
Scarf- pull a part Twizzlers
Buttons- round decorating confetti

You can easily change any of the candy accessories to fit your snowmen.

You will also need:
1 package of pretzel rods
white chocolate for dipping


This is a closer look at the jelly bean top hats with a Twizzler rim.

Melt white chocolate according to the package directions.

I used a spoon to smooth chocolate on the pretzel rods because they were too large to actually dip. Then place them on waxed paper and let the pretzels cool for a few minutes. Afterward, I allowed my little one to sprinkle sugar crystals and my older children were able to place the eyes and buttons.
Place the snowmen in the fridge for about 15 minutes to allow the chocolate to set.


Use white chocolate as glue to place the hats on top of the pretzel stick.
Dip the gum drop and jelly bean hats in chocolate and then place the hats on top of the pretzel stick. Hold for a minute or until the hat is in place. Once the hats have harden in place, wrap Twizzler scarfs around the neck of the snowmen. Add the nose with orange icing and a smile with black icing.

You now have a wonderful treat that everyone will enjoy!


Related Posts Plugin for WordPress, Blogger...