March 29, 2012

Tortilla-Chip Crusted Chicken with Pineapple Kiwi Salsa


Found this recipe in Southern Living about 4 years ago and still make this recipe today.
A perfect dinner for a delightful spring night.
This recipe is a definite crowd pleaser :)
Serve with refried beans or Mexican rice and you will have  a delicious meal that everyone will be praising you over! 
 
Tortilla Chip Crusted Chicken
 
Ingredients
1 pound chicken breast tenders
1/2 teaspoon salt
1/4 teaspoon pepper
1/3 cup all-purpose flour
1/2 tsp dried oregano
1/2 tsp chili powder
1/2 tsp garlic powder

1/4 teaspoon ground cumin
2 large eggs
cooking spray
2 cups crushed tortilla chips
Preparation
1. Preheat oven to 425 degrees. Pat chicken dry with a paper towel and sprinkle chicken with salt and pepper. 

2. Combine 1/3 cup flour and next 4 ingredients.


3. Next, whisk eggs just until foamy.

4. Place a wire rack coated with cooking spray on a 15- x 10-inch baking sheet.


5. Dredge chicken tenders in flour mixture, shaking off excess; dip in egg mixture, and dredge in crushed tortilla chips. Lightly coat chicken on each side with cooking spray; arrange chicken on wire rack.


6. Bake at 425 degrees for 18 to 20 minutes or until done, turning once half way through. These tortilla crusted chicken strips pair very well with this pineapple kiwi salsa.

Pineapple Kiwi Salsa
Ingredients
2 (8-oz.) cans pineapple tidbits, drained
*of course fresh pineapple is always a good choice as well
2 kiwifruit, peeled and diced
2 tablespoons fresh cilantro leaves, finely chopped
2 tablespoons fresh lime juice
1 teaspoon minced jalapeño pepper
Salt to taste
Preparation
1. Stir together first 5 ingredients; add salt to taste.
I also make my own cilantro lime sour cream to compliment  the chicken and salsa YUM, YUM...
 
Cilantro Lime Sour Cream
8 oz light sour cream
juice of 1 lime
zest 1/2 lime
1 TBS chopped cilantro (add more if you like)
1/8 cumin
1/4 chili powder
salt to taste

Mix all ingredients and dollop over chicken and salsa!

Enjoy!

March 27, 2012

Tuesday's Kitchen Tip {Conversion}

Always have a conversion chart near by in the kitchen.
I have 3 different conversion charts inside my cabinet door for quick reference.
After seeing all these cute printable conversion charts I am thinking laminate and magnets so I can display these cuties on the fridge!

I have found 3 styles of cute and free printable conversion charts just for you!
Happy Printing ;)

Plucky Momo
image

Lovely Little Snippets

image


Chasing Delicious

image

Have a wonderful day!

March 26, 2012

Must Try Monday {Philly Cheese Steak}


Hi everyone, hope you had a fabulous weekend!
Welcome to Must Try Monday!
Starting today and every Monday I am going to feature a
Must Try Recipe from my Pinterest board and let you know what I think!

Today I am featuring Philly Cheese Steaks Sandwiches from
Christine is Cooking

This is mine

Philly Cheese Steak

and this is the picture and recipe I pinned!

image

Click here for Christine's full recipe.

What I did differently and my thoughts!
When making a new recipe I always Google other recipes and see what everyone else is doing!
I am a Texas girl and have never been to Philly, therefore have never had an "authentic" Philly Cheese Steak sandwich. After doing a little research I found many people use thinly sliced sautéed rib eye for an authentic meat choice. For the cheese option many people use cheese whiz or provolone. Once I read the original recipe I knew I wanted to change the meat option to rib eye.

- I thinly sliced approximately 2 lbs of rib eye.
- I did not add green peppers, onions, or mushrooms to the crock pot.
- I did use 32 oz of beef broth
(I think this was too much broth!
Next time I will only cover the the meat.)
- I did not use a packet of good seasonings. Instead I added a 1 tsp of garlic powder, 1 tsp onion powder and salt and pepper to taste.
- 6 slices provolone cheese
- Italian dressing
- 6 hoagie rolls
 
I added the steak, broth, and seasonings to the crockpot and cooked for 8 hours on low. I thinly sliced bell peppers, onions, and mushrooms and sautéed them until tender. I preheated the oven to 400 and added steak, cheese, and bell pepper mixture to each hoagie roll and placed in the oven until cheese was melted and bubbly. Then topped off each sandwich with a little Italian dressing and served with chips. This was a nice and easy dinner option that I will be trying again.
Although I do not think I will cook the meat in the crockpot but rather sauté the steak next time.

Hope you enjoy this review and I would definitely recommend this Philly Cheesesteak for a 
family dinner night.

March 22, 2012

Potato, Broccoli, & Cheese Soup


If you read
Sunday's Post
this is the
soup recipe I promised.
This delicious soup was made by my daughter for me and the family when I was sick in bed a few weeks back. She took what she learned from making baked potato soup and added broccoli.
She is going to make a great Mama one day and a great contestant on Master Chef in a few years! :)

Potato, Broccoli, and Cheese Soup OAMAAC

Ingredients:
1/4 cup melted butter
1/4 cup flour
2 cups half and half cream
1/2 medium chopped onion
2 minced garlic cloves
3 cups chicken stock
2 medium
potatoes, cooked and mashed
2 medium raw potatoes cut into small chunks

3 cups of fresh chopped broccoli
8 oz  mild yellow cheese, grated

Preparations for Potato, Broccoli, and Cheese Soup

kosher salt and pepper to taste
Tony's Creole Seasoning to taste
A few splashes of Louisiana Hot Sauce (I use 4 splashes)
Top each bowl with bacon bits
(I use turkey bacon)


Directions:

In a small sauce pan boil two potatoes in water until tender.

Then
drain, mash, and set aside.

Sauté
onion and garlic in butter or olive oil. Set aside.

Then
cook melted butter and flour using a whisk over medium heat for about 1 minute in a large stock pot, then whisk constantly while adding the half and half.

Add chicken stock and bring back to a boil, stirring occasionally. Add sautéed onions and garlic, raw potatoes, and mashed cooked potatoes.

Simmer for 10 minutes, then add broccoli and cook an additional 10 minutes or until both potato and broccoli are tender. Stir occasionally to prevent sticking! If
the soup mixture is too thick add more chicken stock until your desired consistency.
Finally, add cheese, salt, pepper, Louisiana Hot sauce, and Tony's Creole Seasoning to taste.
Potato, Broccoli, and Cheese Soup

Allow the cheese to melt.
Top each bowl with bacon bits, serve warm, and enjoy!
Potato, Broccoli, and Cheese Soup OAMAAC

March 21, 2012

Tuesday's Kitchen Tip {how to get the most juice from your lemons}


Today I am going to let you know how I get the most juice out of my lemons. I love cooking with fresh lemon juice and adore a fresh glass of lemonade on a hot summer day!

First, let your lemons reach room temperature.

Then roll the lemon with the palm of your hand several times back and forth to help release the juice inside.

Roll lemon with palm of hand

Next, cut in half and use a lemon squeezer of your choice and squeeze :)

Juicing a Lemon

When deciding how to pick your lemons from the grocery store stay away from rock hard lemons. You want your lemons to be firm, but give a little. Also, pick nice yellow lemons and stay away from ones that are still green or light in color. Avoid ones with marking, bruises, and open cuts.

Hope you found this kitchen tip useful!
Thank you for stopping by and have a wonderful day!

March 18, 2012

Cranberry Orange Muffins

Pin It


Wow, I am so blessed that some of my favorite bloggers were able to help out for the last two week while my husband was in from Afghanistan.
If you missed any of these wonderful ladies recipes check out
Guest Post
and stop by and show them some love!

Today I am sharing this wonderful Cranberry Orange Muffin Recipe my 15 year old daughter adapted from
Taste of Home!
This is a wonderful treat for breakfast
and we have already made this recipe twice :)


Canberry Orange Muffins

I was actually sick in bed when she made these for the family and she is also responsible for the photo!
Isn't she sooo sweet :)
I am blessed that she loves to work in the kitchen beside me!

My daughter 
Later this week I am going to share the Broccoli, Potato, and Cheese soup she made for me too and all in the
same day I might add!
Ok, enough bragging...now on to the recipe!

Ingredients
makes 12 muffins

2 cups + 3TBS all purpose flour
1/2 cup sugar
2 tsp baking powder
1/2 tsp baking soda
1/4 tsp salt
1 1/2 cups of fresh squeezed orange juice with pulp
1/4 cup vegetable oil
1/2 tsp vanilla
1 egg
1 cup of frozen or fresh cranberries, halved


Directions
Preheat oven to 400 degrees. In a large bowl, combine the flour, sugar, baking powder, baking soda, and salt. In another bowl, combine the orange juice, oil, vanilla, and egg; stir into dry ingredients just until moistened. Fold in cranberries.

Coat muffin tin with cooking spray or use paper liners; fill three-fourths full with batter. Bake for 15-20 minutes or until a toothpick inserted near the center comes out clean, serve warm. 

Enjoy :)


March 15, 2012

Guest Post {The Johanson Journey}


Hey Blog Friends!! My name is Janette from the Johanson Journey

IMG_1536[3]
I’m proud to be a guest blog with Audra while she gets some MUCH DESERVED one on one time with her sweet hubby and kiddo’s while he is home for R&R from Afghanistan!! My husband is in the Army and has left for 2 tours over seas so there is nothing more special than this time!! I’m thrilled to be here but I’ll admit—I’m not the best when it comes to the kitchen!! In fact, I own a Kitchen-aid mixer and it is tucked away in a cabinet with a thin layer of dust from not being used.. so you may wonder—what in the world am I doing on a Cooker’s blog!??!

I love food and I admire those who can cook but I’m not going to lie—when I hear words “from scratch” written for any recipe…. I tuck and run as FAST as possible.


So I’m showing you the full time working mom of 3 kids under the age of 4 way…… which is why I call my post the HALF WAY… b/c that’s all I have time for… the easy version.
{Note: This post is PG-13 and not intended to offend…these can be used for a bachelorette party, breast cancer awareness month, a sweet joke for a friend who might be getting enhancements… or just for fun}


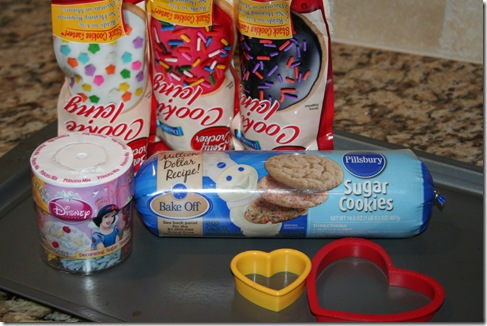
First up you will need a tube of sugar cookie dough, fun sprinkles, icing of your choice and a heart cookie cutter that you might have to borrow from a neighbor because you don’t actually own one yourself.

IMG_1958


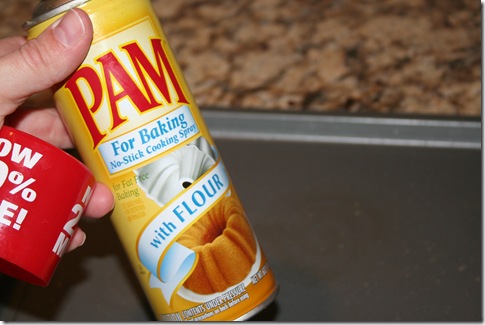
I spray my cookie sheet with PAM for baking with Flour because it seems to work the best!

  IMG_1959

Sprinkle a little flour on your counter to help keep the dough from sticking and if you have a roller, you can use that to spread it out.

 
IMG_1960

Using your heart cookie cutter, gently cut out your hearts to be baked as shown. 


 IMG_1962

Now here comes a sticky situation…. do you see my hearts puffing up and losing their shape!? ME TOO!! UGH!! I have no idea how to stop this…. 


 IMG_1964

So to correct this problem… I come up with my next step…. I take the cooled down cookies and RE CUT them with my heart cookie cutters. No one has to know.. it can be our secret…

IMG_1966 IMG_1967

Next up is the decorating… yes I went a little nuts because they were turning out so darn cute!! I will admit, my creativity for types of bras was running low…but basically I spread the icing on and used toothpicks to help get the icing evenly spread and used them also for helping to place some of the sprinkles..

IMG_1968 IMG_1969 IMG_1971 IMG_1972 IMG_1975

For the professionals out there……You’ll need a fabulous Sugar Cookie Recipe. Next you’ll need a Royal Icing Recipe. Before you dive in, make sure to read over Sweetopia’s Top 10 Royal Icing decorating Tips and 10 Royal Icing Mistakes to Avoid. Marianne of Sweetopia, creates some awesome cookies that I thought I would try and also got this idea from How Does She Blog…..
Thank you Audra for inviting me to guest post.. I promise you and your readers I am more of a G to PG kind of blogger but every now and then trying something fun like this is worth a shot! Enjoy!!
If I haven’t scared you off, stop by and visit!! I love meeting new blog friends!

March 14, 2012

Guest Post {The Sweet Spot}


Hi! I'm Paige from The Sweet Spot and I'm so happy to be here at
Once a Mom Always a Cook (I love that title, it's so true!).
I LOVE to bake and cook. I use mostly organic ingredients and make almost everything from scratch. I hope you will stop by my blog and check out some of my other great recipes :)

I know, you're wondering how on earth a cake made with garbanzo beans could taste good but I promise this cake will shock you with how tasty it is! Not only is it somewhat healthy and gluten free but it is super simple to make. You've got to love a recipe with only five ingredients!

Recipe adapted from Holistic Moms Network cookbook.

Ingredients
1 (12 oz.) pkg of high quality semi-sweet chocolate chips, melted
2 cups cooked garbanzo beans, drained and rinsed
4 eggs (farm fresh is always best!)
1/2 cup organic sugar
1/2 tsp baking powder

Preheat oven to 350 degrees F. In a food processor or blender, combine all ingredients and process until smooth. Pour into a greased 9-inch round pan and bake for 40-45 minutes. Cool thoroughly and sprinkle with powdered sugar if desired.

March 13, 2012

Guest Post {Crumbs and Chaos}


Hi, I’m Becca from Crumbs and Chaos, a blog I write with my 3 sisters. We have 11 children between us, hence the name Crumbs and Chaos…we deal with our fair share on a daily basis. We love sharing our favorite recipes, tips on controlling the chaos and seeing awesome things from our readers every Saturday at our Seasonal Inspiration link party.
I am honored to be here today at Once a Mom...Always a Cook
sharing this deliciousness with you.


Sometimes it doesn't hurt to make breakfast a little special. We're no stranger to breakfast at Crumbs and Chaos, we love it every which way. Recently my husband picked up a croissant stuffed with ham and cheese at a local coffee shop, it was absolutely to die for! The pastry was so delicious and came apart in layers. I had to do my best to recreate it at home since the $2.50 price tag makes it an occasional treat.

So I simply took puff pastry, cut it into triangles and put ham and swiss inside. These weren't exactly like the ones from the coffee shop, but definitely delicious in their own right! They go perfect alongside your morning coffee or would be a great addition to your next brunch.


1 sheet FROZEN PUFF PASTRY (half of a 17.3 oz. pkg.), thawed
8 slices thinly sliced BLACK FOREST or HONEY HAM
Thinly sliced SWISS CHEESE
1 EGG
1 teaspoon WATER

Preheat oven to 400°.

Lay puff pastry on lightly floured surface, roll out slightly. Cut into quarters, cut each square into 2 triangles.

On each triangle, lay a slice of cheese and a slice of ham. Starting with long end, roll up and lay on a parchment paper lined baking sheet.

Beat together egg and water. Brush tops of pastry with mixture.

Bake for 15-17 minutes or until golden brown. Serve immediately.

*Please note: these are best served right away and don't reheat very well.


Stop on over and say hi!

Subscribe to our RSS Feed

Follow us on Facebook
Follow me on Pinterest
Follow us on Twitter

March 12, 2012

Guest Post {Raising 4 Princesses}

Hello, everyone!
I'm Maria and I blog over at raising4princesses blog.
I'm an American wife and mom living {and loving} on the Island of Jamaica.
After getting my college degree, I now spend my days typing on tutus,
building castles out of chairs, and dressing baby dolls
...all while remembering the phonics rules, forgetting the laundry on the line and burning dinner.
I love being raised by my 4 little princesses.
I'm a country girl from Northeast Missouri that God placed on a tropical island.


My Prince Charming is from Baton Rouge, Louisiana. That's south, y'all!
Down there they have a {wildly} popular fast-food chain of just chicken strips, fries and
Texas toast.
It's called Raisin' Cane's Chicken Fingers. If you're in the area, you've got to try it!
We think that the secret to his success is "the sauce".
It is this yummy spicy sauce that comes with your meal.
You'll find your self use your chicken, fries, and toast to whip every last drop out of the little container. We always order extra!
Honestly. We miss the sauce. Literally. Crave the sauce.
So, for a few months I played around with some ingredients and we think this is REALLY close!

We just simply call it "the Sauce", 'cause now we eat it on most everything!


Here's what you gotta do!

1 cup mayonnaise
1/4 cup ketchup
a shy 1/8 cup chili sauce (I use our local Jamaican Hot Pepper Sauce)
2 teaspoons Worcestershire sauce
1 1/2 teaspoons mustard
1 teaspoon onion powder
1 teaspoon garlic powder
1 teaspoon ground black pepper
1/4 cup light olive oil
1 tablespoon of lemon (or lime) juice

Mix all ingredients together well. Store in an air-tight container OVERNIGHT..don't rush it.

We've found this gets better the older it gets. Honestly though, it never lasts too long!

Notes: My husband likes it spicy, so sometimes I double the chili sauce. Also, I've tried fresh garlic but the powdered garlic has a more subtle blended taste. For this recipe the powdered is best. For the oil, I use coconut oil...since I live where there is coconuts. {smile} But I'm sure olive oil would be just as good.

Hope you enjoy!

Thanks so much, Audra for allowing me this opportunity to guest post here! Even though I've not meet you in person I want to say I'm so proud and thankful to you and your husband for the sacrifices you make!

March 8, 2012

Guest Post {52 Mantels}


I am SO honored to be sharing this yummy trifle with you guys. Obviously Audra has some serious skills in the kitchen, but this recipe is for the skilled AND unskilled (like, me!). Raise your hand if you like easy. Well, then sit on down and I'll share some easy with you...while Audra spends time with her hubby.

Can I just say, as the sister to a soldier, I so admire men like Mr. Always A Cook who are willing to give the ultimate sacrifice for the great US ofA.

I also think the name of this recipe says it all. We've got butterfinger. We've got trifle. We've got happiness in a Pampered Chef dish.

Every 6th Wednesday night it's my hubby's and my turn to take dessert to our small group gathering. Last week we were up and I decided to make something especially for my hubs. I asked him for his most favorite candy bar selection and he responded with Butterfinger.

(What? Should I have already known my husband's most favorite candy bar?)

I decided on a trifle, because trifles are easy, yummy and pretty. Plus, they're pretty hard to mess up. I took my cues from the candy bar and embraced the peanut butter/chocolate combo.

Why mess with a good thing?

Butterfinger Trifle

1 box of brownie mix
1 8-ounce container of sour cream
2 small boxes of vanilla pudding
1/2 C of creamy peanut butter
1 pint of whipping cream + sugar to taste
4 fun-size butterfinger candy bars- crushed

Make the brownies according to the package instructions PLUS add the 8 ounce container of sour cream along with the ingredients listed on the box. This will make your brownies extra dense and moist! While the brownies are baking, mix the two boxes of pudding with 3 cups of cold milk and 1/2 cup of peanut butter. Place your pudding in the fridge while you beat your whipping cream until it thickens. Add sugar to taste. I prefer my whipped cream to be only slightly sweet to tone down the sweetness of the other layers. But, you can make it extra sweet and sugary if you want. I won't tell on you.

When your brownies are done, cut them into small cubes and begin layering your trifle. Brownie, pudding, whipped cream, repeat. You should have two layers of each. Top your trifle with the crushed butterfinger and place in the refrigerator until ready to serve. I prefer to let trifles chill for several hours before serving. In fact, they tend to taste better with each passing day, so don't be afraid to assemble this a day before serving!

Want to hear my sob story? I sent this dessert to small group with my hubby while I stayed home with our little sickie. I was very much looking forward to him returning with some leftovers so I could enjoy a bite or two.

He returned with an empty dish.

Sad. But, also testament to the yumminess of this peanut buttery, chocolatey, butterfingered recipe.

Enjoy! And, to do so, you might ought to serve yourself first.
Just sayin' :)

March 7, 2012

Guest Post {Cherished Bliss}

Hello everyone! I’m Ashley… Audra’s YOUNGER sister.
I only emphasize YOUNGER because she’s NINE years older and well everyone either thinks we are the same age or that I’m older. I guess that’s just what you have to deal with though when you have a beautiful sister : ) (love you Audra!)

But really… I am her YOUNGER sister. Ok, I’m done this time : ) 


I wish I could post a picture of us together, but I think we are always the ones with the camera in our hands
Audra – we need a picture of us together! OK? ok! 

Ashley

I’m so excited to be posting on my sister’s delicious blog while her husband is in town! I’m not near as good a cook as my sister… that’s why she has the food blog and I have the craft blog. BUT we did learn how to cook from the same person – our lovely mama : ) So I can cook…. I promise : )
I don’t want to scare you off from trying this recipe! 

A little while back my husband and I went on this diet (note to self, I’m just not a good dieter… I like food). Anyways, we basically couldn’t have any kind of sugar. Which means no marinade, no salad dressings.. you know all that good stuff. There was a recipe for some homemade BBQ sauce that I found, I made it a while back when my husband was on the diet without me, and it wasn’t very good. So I took the base ingredients and made my own seasonings and well.. I hate to toot my own horn, but TOOT TOOT. This stuff is delicious.. doesn’t feel like you are on a diet at all! It’s not really for dipping… it’s pretty stout, so I would suggest just cooking with it. 


{Ingredients}  
(This makes enough for about 2lbs of meat)

- 6 oz. of canned Tomato Paste
- 1/8 cup Apple Cider Vinegar
- 1/4 cup Vinegar
- 2 tsp. liquid smoke
- 1 1/2 tsp. Worcestershire Sauce
- 3 cloves Minced Garlic 

-1 tsp. Truvia
- 2 tsp. Minced Onion (dehydrated)
- Garlic and herb seasoning to taste
- Salt and Pepper to taste
- Juice of 1 lemon

{Make it}

ONE.  
Combine all your ingredients in a saucepan, and set the temperature to a medium-low setting.
Combine BBQ Sauce Ingredients

TWO.
Start mixing together all the ingredients until it gets pretty warm. (not boiling though) Then turn it to a low temperature and just let it warm for about 5-10 minutes.
Mix BBQ Sauce Ingredients

THREE.  
Spread all over your chicken. Let it marinade for a while. I let mine marinade for a whopping 10 minutes. (I was in a hurry… probably because I NEVER plan out meals)
Marinate with BBQ SAUCE

FOUR.  
Grill it to your liking and serve with some yummy sides! I like my chicken a little on the burnt side – something our mom taught us! : )
Homemade BBQ Sauce

Thanks so much for having me over Audra! : )
I’m lucky to have such a great sister!
PS. You can bring me food whenever you like ; ) 

I’d love for you to stop over at my blog, Cherished Bliss and say Hi! You can check out some of my craft tutorials and link up any projects/recipes at my link party that runs Monday night – Friday.


March 6, 2012

Guest Post {Six Sister’s Stuff}

Hello! We are the sisters who blog over at Six Sisters' Stuff and we are so excited to be here today on
"Once a Mom Always a Cook"
Over on our blog we post easy (and delicious!) recipes, crafts, and anything else we feel like sharing.
Today we want to share our No Bake Thin Mint Cookie Truffles.
These little balls of goodness are amazing (especially if you love the mint and chocolate combo!). Best part about them: no baking required and only 3 ingredients are needed! These would also be so fun for St. Patrick's Day!
Ingredients:
-1 (9 oz) package of Girl Scout Thin Mint Cookies
(or Keebler Grasshopper cookies)
-1/2 package (4 oz) cream cheese, softened
(I used fat free and it worked great)
-1 (12 oz) bag Guittard's Green Mint Chips
(I just found these at the grocery store)

Directions:
In a food processor, pulse the Thin Mints a few times, and then blend them down until they are just crumbs. It might be easier to do this in two batches (even if you don't have a food processor, you can still make these. Throw the cookies in a big Ziploc bag and start pounding them with a hammer until you have a lot of fine crumbs).
Next, mix the cream cheese and cookie crumbs together in a bowl until well-mixed. Roll the mixture into 1 inch size balls, and place them on a wax paper covered baking sheet. Place the baking sheet in the fridge for about 30 minutes, so the balls are easier to dip in the chocolate and do not fall apart.

Once the truffles have been in the fridge for a while, melt the green mint chips in a microwave-safe bowl in the microwave. Heat the chips for 30 seconds at a time, stirring in between each heat burst. Repeat until the chips are all melted.Roll each ball in the melted chips until it is fully covered. I usually use two forks to push the truffle around until it is all covered.

Then, using the two forks, carefully pick up the truffle and allow the excess mint chocolate to run off before placing back on the wax paper. Repeat with all the truffles. Stick the truffles back in the fridge for a couple of minutes or until the mint chocolate is hardened.

If you want to decorate your truffles as I did, melt about 1/2 cup of white chocolate chips (or almond bark or white candy coating-whatever you want) the same way that you melted the mint chips. Spoon the white chocolate in a small Ziplock bag and cut a tiny bit of one corner off the bag. Start small at first, then if you need, make the hole a little larger. Drizzle the white chocolate over the green truffles.Place back in the fridge until you are ready to devour eat them.

If you can't find those green mint chips, these can be made with almond bark or vanilla candy coating. It would also be cute to set aside small amount of cookie crumbs and sprinkle them on top of the truffles.
 Sprinkles also look cute on these too!

For more easy and delicious recipes, stop by our blog anytime!
We would love to have you come over and say hi!
Related Posts Plugin for WordPress, Blogger...