Showing posts with label Cupcakes. Show all posts

May 20, 2013

Dreamsicle Cupcakes

Posted By: Christian (Audra’s daughter)
I have to admit here in Texas we have had a cooler spring than usual. However, with summer around the corner temps are beginning to rise, I find myself baking with more refreshing and cooler flavors. The cupcake I am about to share with you has been in my recipe book for awhile, since I was about fourteen. At that time in my  life I could not get enough Sunkist to drink, and I began using the citrus soda to bake with. I have not made this recipe in a while and last weekend I rediscovered it in my recipe book, and after tasting this refreshing cupcake I knew I had to share the recipe with my mother’s lovely readers. So lets get baking!

Dreamsicle-Cupcake 
Ingredients:
Yields 12 cupcakes
1/2 cup butter at room temp.
3/4 cup sugar
2 eggs
1/2 tsp vanilla
1 1/2 cup flour
3/4 tsp baking powder
1/2 cup Sunkist
3 TBS half and half
1/2 TBS orange zest (1 large orange)

Cream Topping
1 cup heaving whipping cream
1/4 cup butter at room temp.
3-4 TBS powder sugar
1/2 TBS orange zest (1 large orange
)

Directions:
1. Preheat oven to 350 degrees F . Line a muffin pan with paper liners.
2. In a medium bowl, cream together the sugar and butter. Beat in the eggs, one at a time, then add vanilla. In a small bowl, combine flour and baking powder, add to the creamed mixture and mix well. Then stir in the Sunkist and half and half until batter is smooth.  Pour or use an ice cream scoop to place batter into the prepared pan. Fill each muffin cup about 3/4 full
.

Dreamsicle Cupcakes
3. Bake 20 to 25 minutes.
Cupcakes are done when it springs back to the touch. Let cupcakes cool completely before applying icing.

Directions for icing:
Chill your mixing bowl and beaters in the freezer for about 10 minutes. Then the chilled large metal bow beat the butter and powder sugar together for about 1 minute. Then slowly add the heavy whipping cream and whip until stiff peaks form. Then stir in vanilla and orange zest. Now you are ready to top your Dreamsicle Cupcakes!
Refrigerate cupcakes until ready to serve. Enjoy!

November 13, 2012

Dulce de Leche Bottom Cupcakes


I know I promised this recipe a few days ago but life happens!
This is such a fun recipe and I would love to share it with you, so lets get started!


Dulce de Leche  Bottom Cupcakes 1

This was actually my daughter's cupcake chose for her 16th party, so it had to be good! A few months back Ann from The Fountain Avenue Kitchen posted an easy slow cooker recipe for Dulce de Leche. My family and I have never tried Dulce de Leche, but after reading her post I envisioned these cupcakes. Black Bottom Cupcakes are a family favorite in this kitchen and I thought how lovely the Dulce de Leche filling would be in the middle of this delicious chocolate cupcake :)

I am so glad we tried it because these cupcakes turned out soOoooOoo good!

*Next time I make these cupcakes I am going to add another egg to the Dulce de Leche filling because it was a little heavy and fell to the bottom, hence the name Dulce de Leche Bottom Cupcakes! This cupcake was very delicious, but I was hoping the filling would of been in the middle! My daughter loved the cupcakes and said she would not change it, but I still want to experiment!


Dulce de Leche  Bottom Cupcakes 2

Filling

For the Dulce de Leche recipe, click here

1 large egg at room temperature, slightly beaten
16 oz dulce de leche

* I chose to slow cook the Dulce de Leche for 10 hours because I wanted a more pudding texture for the cupcakes.

Cake Mix
adapted from Chocolate Galore Cookbook
makes 24 cupcakes


2 ¼ cups- cold water
¾ cup- melted butter
1 TBS- vanilla extract
2 TBS- balsamic vinegar
3 ½ cups – all purpose flour
¾ cup- cocoa powder
2 tsp- baking soda
2 ¼ cups- sugar
1 tsp salt
¾ cup- semisweet chocolate

 Preheat - the oven to 350 and line a muffin pan with paper cupcake liners.

Make the filling- in a medium bowl mix the egg and the dulce de leche until smooth.

Prop up a pastry bag in a tall glass with the bag’s wide opening at the top. Fold the top of the pastry bag down over the glass. Scrape the filling mixture into the pastry bag. Set the filled pastry bag aside.

Mix the liquids- In a small mixing bowl combine water, melted butter, vanilla extract, and balsamic vinegar.

 Make the batter- In the a large bowl, use a whisk to stir together the flour, cocoa powder, baking soda, sugar, and salt until evenly blended.

Slowly pour the liquid mix into the flour mixture. Stir until the batter is smooth.

Pour in the batter- Fill each lined muffin cup three-quarters full. 

 Add the filling- Pick up the pastry bag and plugging the tip with one hand, twist the top of the bag to close it. Using one hand to guide the top and the other to squeeze the top of the bag, insert the tip into the center of one of the cupcakes. Gently squeeze a small amount of the dulce de leche filling into the batter. You will see the chocolate batter rise as the filling fills the middle.

 Bake the cupcakes- sprinkle the top of each cupcake with the chocolate chips.

Put the muffin pans in the oven and bake until a thin skewer inserted in to the center of a cupcake comes out clean. Bake about 25 min.

Let the cupcakes cool in the pans for 20 minutes, then lift out the cupcakes and put them directly a cooling rack for about 30 minutes or until completely cool.

Enjoy!

October 4, 2012

Apple Spice Cupcakes Topped with Caramel

Recipe by: Christian (Audra’s daughter)

The first day of fall arrived in September, and now suddenly everything is changing. Leaves are switching colors, cooler temps are here, and spices such as cinnamon and nutmeg are finding their way back into recipes. With all the change I decided it was time for a new cupcake recipe in my family’s kitchen, so I went to search on Pinterest where you can find any cupcake idea, literally. I found many inspiring fall cupcake recipes. Considering all the ideas, I created these amazing Apple Spice Cupcakes that I would love to share with you! I can definitely say I am falling for fall indulging in this cupcake. It has the perfect amount of spice, nutty-ness and applely goodness all wrapped up in a cupcake liner. This cupcake would be a great fall treat for bock parties, Halloween parties, and any fall related event. Now with no more delay here is the recipe…

Apple Spice Cupcake

Ingredients:
Makes 12-14 cupcakes

Spice Cupcake
1/2 cup of brown sugar
1/2 cup of white sugar
1/2 cup of butter
2 eggs
1 tsp. vanilla
1 & 1/2 cups of flour
1/2 tsp. cinnamon
1/2 tsp.nutmeg
1/4 tsp. ginger
1/4 tsp. all spice
1 & 3/4 tsp. baking powder
1/2 cup of milk

Apple Mixture
2 granny smith apples
1/4 tsp. cinnamon
1/4 tsp. nutmeg
sprinkle of sugar
1 TBS of corn syrup

Caramel Sauce
Recipe from: My Baking Addiction
1 cup sugar
1/4 cup water
1 TBS of corn syrup
1/2 cup heaving whipping cream
1 tsp. vanilla extract
1/2 tsp. of salt (optional)

Toasted Pecans
1/2 cup chopped pecans
1 TBS butter melted

Directions:

Fist make toasted pecans- Mix chopped pecans and butter until evenly coated, then spread pecans on a cookie sheet lined with parchment paper.
Bake at 350 for about 10 min or until toasty!

Then in your preheated oven of 350 degrees get ready to add apples. Peel, slice, and chop the apples into small cubes. Then place in a small pan (I used a pie plate) add spices and corn syrup and stir together. Place in the oven for 10 minutes. This allows the apples to soften and soak in fall flavors.
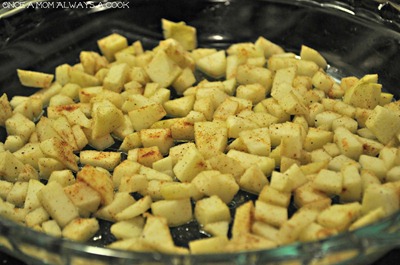
Apples and Spice in oven

While the apples are in the oven make the cupcake batter.
In a medium bowl, cream together the sugars and butter. Beat in the eggs, one at a
time, then stir in the vanilla. Combine flour, spices, and baking powder, add to the creamed mixture and mix well. Then stir in the milk until batter is smooth. Finally once apple mixture is done combine with the batter and stir in.

Apples in Batter

Pour or use an ice cream scoop to place batter into the prepared pan. Fill each muffin cup about 3/4 full. Place in the oven at 350 degrees for about 15 to 20 minutes or until a toothpick comes out clean. Allow to cool for about 10 minutes.

Next comes the caramel:

Step 1. Place sugar, water, and corn syrup in a small saucepan and stir until the sugar is completely moistened. Place a candy thermometer into the pot and make sure that the tip is submerged. Place on medium to low heat.

Dissolving Sugar

Step 2. Stir consistently, until the sugar completely dissolves and the syrup is bubbling. Stop stirring and allow the mixture to boil undisturbed. When the mixture gets to about 300 degrees keep a close eye because the temperature will rise fast and at 325 degrees be prepared to take it off at any second. I made this recipe several times and the recipe I followed said to take it off at about 350, but for me I noticed the perfect temperature is 330 to 335. It is amazing how even 5 degrees can make a difference because in one version I took the pot off at 340 and it still tasted burnt.

Caramel Boiling Point

Step 3. Once at 330 to 335 degrees remove from heat. Pour in the heavy cream slowly because it will bubble up furiously. Then add vanilla and salt.

Adding Heavy Cream to Caramel

Allow to cool for about 5 to 10 minutes before placing into another container. Once both caramel and cupcakes are cool enough, spread the caramel on top of the cupcakes. Top with toasted pecans and indulge. Their will be extra caramel left to place in coffee, put on apples, and to eat off the spoon, it’s that good. The caramel stays good in the refrigerator for about 3 weeks and if left on the counter for 3 days. If you want you can refrigerate the cupcakes. They are best served warm, so if refrigerated stick in the microwave for about 10 seconds.

Apple Spice Cupcakes

I hope you enjoy this recipe as much as my family and I did.
Thank you for stopping by.

May 29, 2012

Blueberry Cupcakes with Strawberry Whipped Topping

If you read my blog you know I am a huge fan of whipped topping! I am not an icing girl, but if you give me whipped topping I am in trouble. Every 4th of July I make angel food cake and cover each slice with fresh strawberries and blueberries, then top it off with homemade whipped cream. Well, for this Memorial Day I thought I would change it up a bit and make Blueberry Cupcakes with Strawberry Whipped Topping. It was one of the most refreshing cupcakes I have ever eaten. If my veteran was home I know he would of enjoyed this cute cupcake too! My husband is currently working in Afghanistan and will be home for a short break at the end of June. I will definitely be making these delicious cupcakes for him this 4th of July!

blueberry cupcakes with strawberry whipped topping
Blueberry Cupcakes
makes 12 cupcakes
recipe found
here, I just added blueberries

1 cup white sugar
1/2 cup butter
2 eggs
2 teaspoons vanilla extract
1 1/2 cups all-purpose flour
1 3/4 teaspoons baking powder
1/2 cup milk

1 cup of fresh blueberries

1. Preheat oven to 350 degrees F . Line a muffin pan with paper liners.
2. In a medium bowl, cream together the sugar and butter. Beat in the eggs, one at a time, then add vanilla. In a small bowl, combine flour and baking powder, add to the creamed mixture and mix well. Then stir in the milk until batter is smooth. Next, fold blueberries in the batter using a spatula. Pour or use an ice cream scoop to place batter into the prepared pan. Fill each muffin cup about 3/4 full.
3. Bake 20 to 25 minutes.
Cupcakes are done when it springs back to the touch.

Strawberry Whipped Topping
1 cup heavy whipping cream
1/2 tsp vanilla extract
1/4 cup powder sugar, sifted
8 fresh strawberries, pureed

Chill your mixing bowl and beaters in the freezer for about 10 minutes. While your bowl and beaters are chilling, put strawberries in blender and puree. Then in a large metal bowl, whip cream until stiff peaks are just about to form. Beat in vanilla and sugar until peaks form.Then gently stir in strawberry puree with a spatula. Now you are ready to top your blueberry cupcakes!

Refrigerate cupcakes until ready to serve.
Enjoy!

April 2, 2012

Must Try Monday {Banana Split Cupcakes}

I cannot believe it has already been a whole week. Seems like yesterday I was writing the Philly Cheese Steak post!
I hope everyone had a wonderful, relaxing weekend.
Well here it is... today and every Monday I am featuring a
Must Try Recipe from my
Pinterest
board and will let you know what I think and things I did differently!
So let's get started...Today I am featuring 
Banana Split Cupcakes from Six Sister's Stuff!
If you have not checked out these sister's blog hop on over there and check out their recipe index, YUM!
The reason I made these cuties is because my sister from
Cherished Bliss
moved away this week and this dessert was her final request from my kitchen :( I am going to truly miss her, she is my very best friend who lived right down the street from me and now she will live across the country from us! There will be lots of skyping! Ok, back on track...

This is mine
Banana Split Cupcakes

and this is the picture I pinned!
image

Click here for Six Sister's full recipe!


My thoughts and things I did differently!
These cupcakes were a big hit and
I will definitely be making these again!!!!!!
The banana cake was to die for! The things I did differently to the batter was reduced the sugar to 2 cups, used regular milk in place of buttermilk, and used about 3 bananas.
The batter was perfect!
I did not use the Vanilla Frosting but instead used a

Homemade Whipped Topping
2 cups of heavy whipping cream
1/2 cup of powder sugar (add more or less to your liking)
1 tsp of vanilla extract

Chill your mixing bowl and beaters in the freezer for about 10 minutes. Then in a large metal bowl, whip cream until stiff peaks are just about to form.
Then beat in vanilla and sugar until peaks form.


Then after making the whipped topping I was out of heavy whipping cream for the ganache, so I substituted the heavy cream with 3/4 cup of half and half and it worked!
Although, I would suggest to half the ganache recipe because it made a lot, unless you have other intentions for the leftovers or you enjoy more ganache than I do on your cupcakes!

Hope you enjoyed this review and I would highly recommend these cupcakes for any occasion!

P.S. My 15 year old daughter said these cupcakes were so good she wants these at her 16th birthday party!

February 28, 2012

Lime Jell-O Poke Cupcakes

Pin It


Today I am skipping my Tuesday's Kitchen Tip to bring you a
cute little cupcake!

Lime Jello Poke Cupcakes

There is something about cupcakes that make me smile :)

My precious sister bought me these cute cupcakes liners from
Pick Your Plum

Cupcake Liners
and invited me to share a cupcake recipe for
these adorable liners at her
Pick Your Plum Party!

If you have any projects using
Pick Your Plum products
head over to
Ashley and Jenette’s  Party
and l
ink up  any creations, projects, gifts, or tutorials.
(This includes showing us ways to wear or pair any fashion items such as shirts, scarfs, jewelry, etc.)

Oh and by linking your favorite PYP post, you are entering to win a PYP Mystery Box full of amazing products!! The winner will be announced on March 7th as our next party begins

TODAY IS THE LAST DAY SO HURRY AND HOP ON OVER THERE!

I picked the green polka dot cupcake liners for this recipe in honor of St. Patty’s Day!

Lime Jell-O Poke Cupcakes

Ingredients for Cupcakes
( I used this Simple White Cake Recipe)
makes 12 cupcakes

1 cup white sugar
1/2 cup butter
2 eggs
2 teaspoons vanilla extract
1 1/2 cups all-purpose flour
1 3/4 teaspoons baking powder
1/2 cup milk
3 oz box of lime Jell-O
Directions
1. Preheat oven to 350 degrees F (175 degrees C). Grease and flour or line a muffin pan with paper liners.
2. In a medium bowl, cream together the sugar and butter. Beat in the eggs, one at a time, then stir in the vanilla. Combine flour and baking powder, add to the creamed mixture and mix well. Finally stir in the milk until batter is smooth. Pour or spoon batter into the prepared pan. 
3. Bake cupcakes 20 to 25 minutes.
Cupcakes are done when it springs back to the touch.

You can pick any flavor of Jell-O!
I used lime because it’s green and Wilton’s Rainbow Sugar Sprinkles because it fits the St. Patty’s Day theme!

4. Boil 1 cup water and add 3oz box of Jell-O, stir until completely dissolved.
5. Poke holes in cupcakes with fork or toothpick. Don't be afraid to poke right down in the cupcake, you want plenty of holes for the jell-o to seep into.

Poke Cupcakes

6. Using a spoon or medicine dropper, pour gelatin mixture over cupcakes (about a TBS or so on each cupcake)

Jello in Cupcakes

7. Place cupcakes in the refrigerator for at least 3 hours. Then top with whipped topping, decorate, and enjoy!

I used homemade whipped topping and tinted it with Wilton’s green icing color.

Recipe for Whipped Topping
2 cups heavy whipping cream
1 tsp vanilla extract
3 TBS of powder sugar sifted
Wilton’s green icing color
(add a little at a time to reach desired shade)

Chill your mixing bowl and beaters in the freezer for about 10 minutes. Then in a large metal bowl, whip cream until stiff peaks are just about to form. Beat in vanilla and sugar until peaks form. Now add icing color a little at a time to reach your desired shade.

After topping your Jell-O Poke Cupcakes with whipped topping add pretty and festive sprinkles and enjoy!

These cupcakes are perfect for any gathering!
Enjoy :)

October 25, 2011

Fun Halloween Cupcakes

       These fun cupcakes are sure to please your kiddos at your Halloween bash this year. 
         
The cake mix I used is the exact recipe off the back of the Hershey’s Cocoa box “Perfectly Chocolate Cake”. I homemade the icing and tented each bowl of icing with Wilton’s icing colors, but if you are short on time use the already made icing.
  
Colors- white, black, brown, green, yellow, and red     
I highly recommend Wilton disposable decorating bags for this project!
Butter Cream Icing
1 stick of butter (at room temp)
2 cups of confections sugar (sifted)
1 tsp vanilla
2 TBS of milk (add more if needed)
In small bowl mix butter and sugar at medium speed until light and fluffy. Then add milk and vanilla until blended well.
To make chocolate butter cream icing add ½ cup Ghirardelli 60% cacao bittersweet chocolate chips melted with the milk and vanilla.
I made chocolate icing for the werewolf cupcakes, but if you want feel free to color your white icing brown.
I doubled the icing recipe and I halved the recipe for the chocolate icing.
Directions for Decorating
1. First with white icing completely ice the eye and spider web cupcakes.
 
2. Then with green icing ice Frankenstein and Monster cupcakes, but only ice half the cupcake for the monster.    
 
3.  Mummies – I used Wilton tip #352 and turned the tip on the side and used a wrapped look. Each mummy is wrapped differently, so don’t worry about technique just have fun. Leave a small opening near the top for the eyes.
 
4.  Next start on werewolves. I used Wilton tip #18 with chocolate icing. Start in the center and sweep out till point, kind of like you are making a flower. Also create little ears.
 
5.  Then change to yellow for the eyes; I used Wilton’s tip #3. I used yellow eyes for the mummies and monster eyes.
 
6.  After that I used Wilton tip # 18 with black icing for Frankenstein’s hair. Switch to tip #3 and fill in pupils for the mummy and monster eyes, Frank’s smile, and spider web.
 
7.  Then Tip #3 and white icing for Frank’s eyes, monster’s teeth, werewolf’s fangs, and werewolf’s eyes.
8.  Next use red icing and tip #3 for Frank’s tongue and red shot eye.
9.  The final touch is black icing and tip #3 for werewolf’s and Frank’s pupils, and werewolf’s mouth .

Enjoy a Merry Not Scary Halloween!
 

September 30, 2011

February 25, 2011

Black Bottom Cupcakes

Pin It

Pull your hair up and call the kids in the kitchen; it is time to have some fun!
You and your family have to try this recipe.
You will surely have smiles all through the day.
 
 
Makes 24 cupcakes
Ingredients

Filling
1 large egg at room temperature
½ cup- sugar
1 package of cream cheese at room temperature
 
Cake Mix
 2 ¼ cups- cold water
¾ cup- vegetable oil
1 TBS- vanilla extract
5 tsp- balsamic vinegar
3 ½ cups – all purpose flour
¾ cup- cocoa powder
2 tsp- baking soda
2 ¼ cups- sugar
1 tsp salt
¾ cup- semisweet chocolate
 
1. Preheat - the oven to 350 and line a muffin pan with paper cupcake liners.
 
2. Make the filling- in a medium bowl, using the electric mixer on medium speed; beat the egg, sugar, and cream cheese until smooth- about 2 minutes.
 
Prop up a pastry bag in a sturdy glass or mug with the bag’s wide opening at the top. Fold the top of the pastry bag down over the glass. Using a rubber spatula, scrape the filling mixture into the pastry bag. Set the filled pastry bag aside.
 
3. Mix the liquids- In a large liquid measuring cup combine water, oil, vanilla extract, and balsamic vinegar.
 
4. Make the batter- In the a large bowl, use a whisk to stir together the flour, cocoa powder, baking soda, sugar, and salt until evenly blended.
Slowly pour the liquid mix into the flour mixture. Stir until the batter is smooth.
 
5. Pour in the batter- Fill each lined muffin cup three-quarters full.
 
6. Add the filling- Pick up the pastry bag and plugging the tip with one hand, twist the top of the bag to close it. Using one hand to guide the top and the other to squeeze the top of the bag, insert the tip into the center of one of the cupcakes. Gently squeeze a small amount of the cream cheese filling into the batter. You will see the chocolate batter rise as the filling fills the middle.
 
7. Bake the cupcakes- sprinkle the top of each cupcake with the chocolate chips.
 
Put the muffin pans in the oven and bake until a thin skewer inserted in to the center of a cupcake comes out clean. Bake about 25 min.
Let the cupcakes cool in the pans for 20 minutes, then lift out the cupcakes and put them directly a cooling rack for about 30 minutes or until completely cool.
 
Note- I have a gas oven and I usually have to take them out at about 20 min of cooking. Just watch and check regularly to ensure they do not burn.
 
8. Enjoy!
 
This recipe is from Chocolate Galore
 
Related Posts Plugin for WordPress, Blogger...